
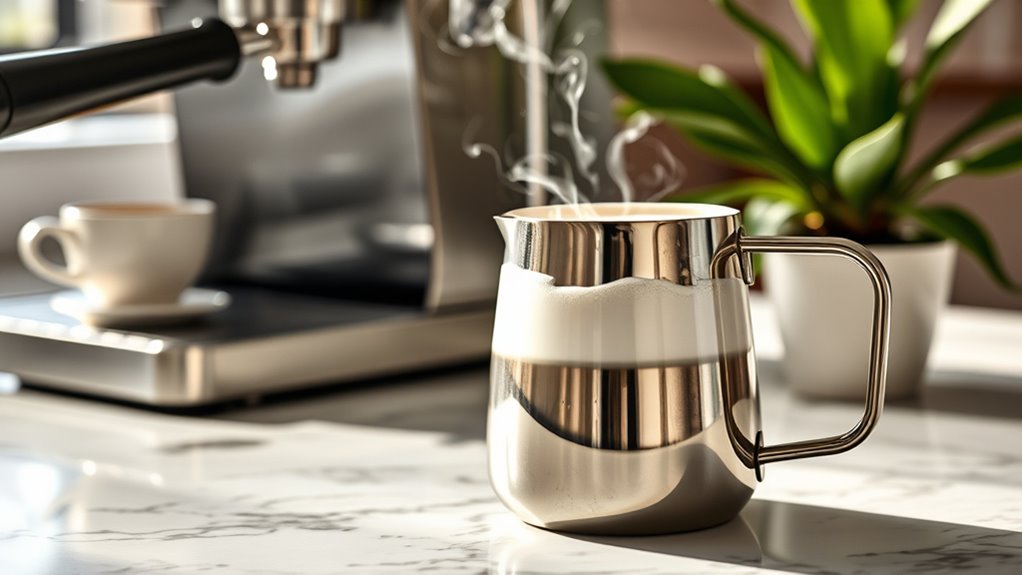
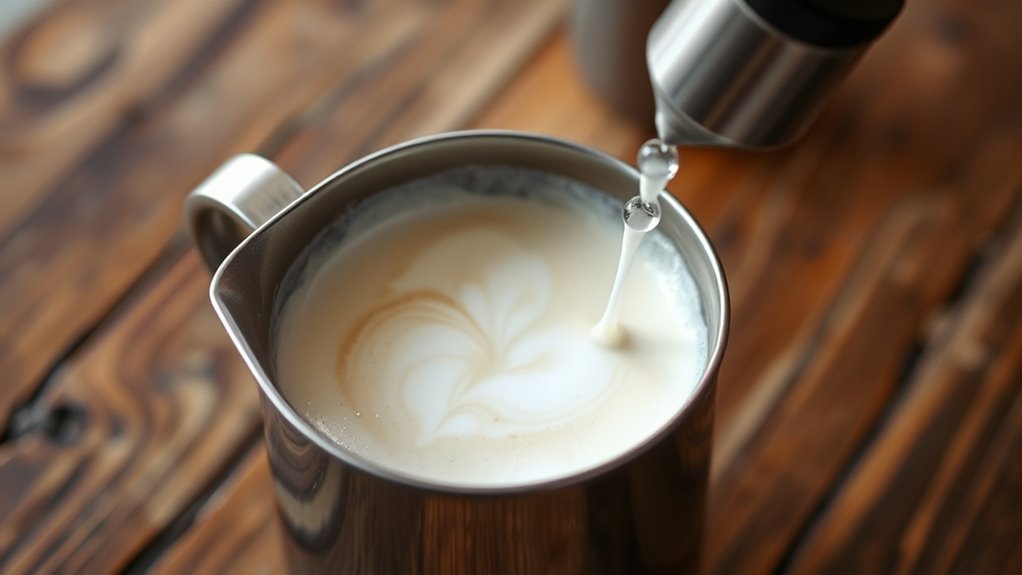
To steam milk like a pro and achieve perfect microfoam, start with cold milk in a stainless steel pitcher, leaving room for expansion. Aim for a temperature between 150°F and 155°F. Position the steam wand just below the surface to create a whirlpool effect while gradually lowering the pitcher. Gently tap the pitcher after steaming to eliminate bubbles. Avoid rushing the process and make sure you’re using fresh milk. Stick around to explore essential tools and troubleshooting tips!
Key Takeaways
- Use cold, fresh whole milk for a creamier microfoam and optimal frothing results.
- Maintain milk temperature between 150°F and 155°F to preserve flavor and texture.
- Position the steam wand just below the milk surface to incorporate air effectively.
- Create a whirlpool effect by moving the pitcher in a circular motion for better foam consistency.
- Practice regularly to refine your steaming technique and achieve consistent microfoam results.

Breville BES003 Temp Control Milk Jug Espresso Accessory for Creating Latte Art
The Breville Temp Control Milk Jug includes an integrated thermometer indicator strip to help you texture milk to…
As an affiliate, we earn on qualifying purchases.
As an affiliate, we earn on qualifying purchases.
Start With a Step-by-Step Guide to Steaming Milk
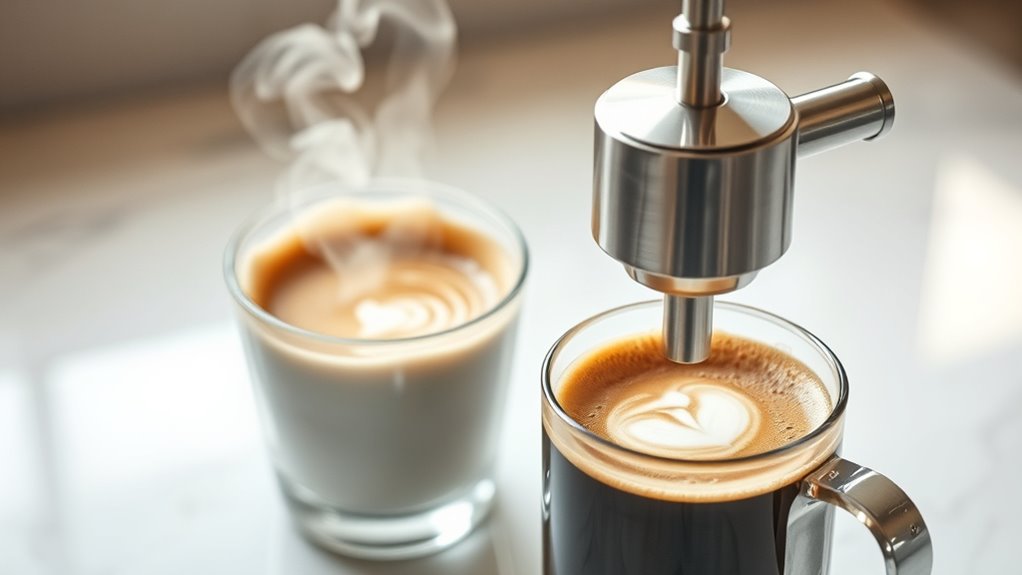
Steaming milk might seem challenging, but with a few simple steps, you can master it in no time. First, fill your pitcher with cold milk, leaving enough space for expansion. Aim for a milk temperature between 150°F and 155°F for best results. Begin by submerging the steam wand just below the surface, then turn it on to create a whirlpool effect. This motion helps incorporate air, which is essential for achieving that velvety microfoam. As the milk heats, slowly lower the pitcher to keep the steam wand submerged. Once you reach the desired temperature, turn off the steam wand and tap the pitcher gently to eliminate bubbles. With practice, you’ll perfect your frothing techniques and impress everyone with your creations!

Milk Frothing Pitcher 350ml/600ml/900ml/1500ml (12oz/20oz/32oz/50oz) Steaming Pitchers Stainless Steel Milk/Coffee/Cappuccino/Latte Art Barista Steam Pitchers Milk Jug Cup with Art Pen,12oz
Perfect Combination Of Milk Frothing Pitcher And Latte Art Pen: The milk frother jug can be used in…
As an affiliate, we earn on qualifying purchases.
As an affiliate, we earn on qualifying purchases.
Essential Tools for Steaming Milk Like a Pro
To achieve barista-level milk froth, you need the right tools at your disposal. Here’s a list of essentials that’ll elevate your milk steaming game:
- Steam wand: This is your primary tool for creating microfoam. Make sure it’s powerful and easy to control.
- Milk frother: A portable option for those who prefer convenience without sacrificing quality.
- Thermometer: Keeping an eye on milk temperature guarantees you don’t scorch it.
- Pitcher: A stainless steel pitcher with a spout allows for better pouring and control.
- Cleaning brush: Regular maintenance of your steam wand keeps it in top shape and ready for use.
- Proper ventilation: Ensuring good kitchen ventilation helps prevent moisture buildup and maintains air quality during steaming.
- Using the right appliance know-how can significantly improve your frothing results and prevent common mistakes. Additionally, understanding milk composition can help you achieve the desired texture and consistency.
With these tools, you’ll be well on your way to mastering the art of milk steaming!

Rancilio Silvia (V1/V2) Steam Wand
Rancilio Silvia (V1/V2) Steam Wand
As an affiliate, we earn on qualifying purchases.
As an affiliate, we earn on qualifying purchases.
Avoid These Common Milk Steaming Mistakes

Even with the right tools, mistakes can easily sabotage your milk steaming efforts. One common error is neglecting temperature control; overheating milk can ruin its flavor and texture. Aim for a sweet spot around 150°F to 155°F. Another mistake is not incorporating enough air into the milk, leading to poor texture variation. You should angle the steam wand correctly to create a whirlpool effect, which helps achieve that velvety microfoam you desire. Additionally, don’t rush the process—take your time to steam and stretch the milk properly. Finally, avoid using old or expired milk, as freshness greatly affects the outcome. By steering clear of these pitfalls, you’ll set yourself up for steaming success!
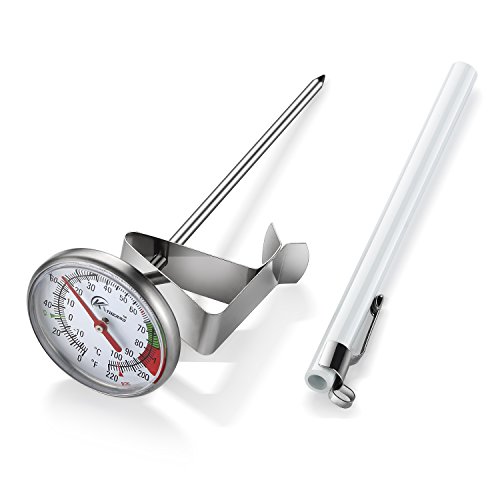
KT THERMO Instand Read 2-Inch Dial Thermometer,Best for The Coffee Drinks,Chocolate Milk Foam
DESIGN:Multi-stage design of the fixed clip, adjust the thermometer read the location of the disk surface to facilitate…
As an affiliate, we earn on qualifying purchases.
As an affiliate, we earn on qualifying purchases.
Steaming Milk: Tips for Consistent Microfoam

Achieving consistent microfoam requires attention to detail and a few key techniques that can elevate your milk steaming game. Here are some essential tips to help you master your craft:
- Choose the right milk: Whole milk creates creamier microfoam, but alternatives can work too!
- Perfect your milk temperature: Aim for 150-155°F for ideal texture without scalding the milk.
- Position your steam wand: Angle it just below the surface of the milk to introduce air effectively.
- Create a whirlpool effect: Move the pitcher in a circular motion to guarantee even heat distribution.
- Practice regularly: The more you steam, the better you’ll understand your equipment and techniques.
With these tips, you’ll be well on your way to achieving that velvety microfoam you desire!
What to Do If Your Microfoam Isn’t Working?
Sometimes, despite your best efforts, the microfoam just doesn’t come out right. When you encounter this issue, start with microfoam troubleshooting. First, check your milk texture; if it’s too hot or too cold, it can ruin your microfoam. The ideal temperature is between 150°F and 155°F. Next, verify you’re using fresh milk; older milk may not froth well. If your steam wand isn’t positioned correctly, it can also affect the foam. Aim for a slight angle so the milk swirls, creating those tiny bubbles. Finally, don’t rush the process. Take your time to incorporate air gradually and maintain that silky texture. Also, proper steaming techniques are essential for achieving consistent microfoam. Keep practicing, and soon you’ll master the art of microfoam!
Frequently Asked Questions
Can I Steam Non-Dairy Milk Alternatives Effectively?
Yes, you can steam non-dairy milk alternatives effectively! Non-dairy options like oat, almond, and soy milk can produce great microfoam with the right steaming techniques. Start with fresh, cold milk and make sure to use a steam wand that’s powerful enough. Adjust your angle to create a whirlpool effect, incorporating air gradually. It might take some practice, but you’ll be enjoying barista-quality drinks in no time!
How Do I Clean My Steam Wand Properly?
To clean your steam wand properly, you should always wipe it down immediately after use. But why settle for anything less than spotless? Use a damp cloth and a good cleaning technique to remove milk residue. Next, purge the wand by turning it on briefly to blast out any remaining milk. Regularly soak the wand in a mixture of water and cleaner to keep it in top shape. Your espresso deserves that!
What Temperature Should My Milk Be After Steaming?
Your milk should reach an ideal steaming temperature of around 150°F to 155°F. At this range, you’ll achieve that creamy, velvety texture perfect for lattes or cappuccinos. If you go too high, you risk scalding the milk, which alters its texture and flavor. So, keep an eye on your thermometer and feel the pitcher; it should be warm but not unbearable to touch. That’ll help you create the best microfoam for your drinks!
How Long Does Steamed Milk Stay Fresh?
Steamed milk stays fresh for about 30 minutes after steaming. Curiously, studies show that milk freshness drops considerably after this time, affecting your drink’s taste and texture. If you’re not using it right away, consider keeping it warm in a thermos or re-steaming it for a better experience. Just remember, the longer you wait, the more the quality diminishes, so enjoy that microfoam while it’s at its best!
Can I Reheat Steamed Milk?
You can reheat steamed milk, but it’s tricky. Using gentle reheating techniques, like a microwave at low power or a stovetop on low heat, helps maintain the milk texture. Stir it frequently to avoid scorching and guarantee even heating. Keep in mind that reheating might alter the microfoam quality, so it’s best to use fresh steamed milk whenever possible for that creamy, velvety experience you love. Enjoy your beverage!
Conclusion
Now that you’ve mastered the art of steaming milk, you’re just a whisk away from creating café-quality microfoam at home! With the right tools and techniques, you’ll impress friends and family, turning your kitchen into a coffee utopia. Remember to avoid common mistakes and practice consistently for that perfect texture. If things don’t go as planned, don’t sweat it—every barista has had their share of foamy disasters. Keep experimenting, and soon you’ll be a milk-steaming legend!