
TL;DR
Moving your rig into a closet can drastically reduce noise, but proper acoustic treatment and ventilation are key. Focus on strategic placement, sealing gaps, and airflow to make it work well. You don’t need a perfect soundproof room—just smart choices.
Ever noticed how your tiny closet sounds like a drum whenever you record or run your AI rig? That echo, that hum—it’s almost unavoidable in small, hard-surfaced spaces. But what if you could turn that chaos into a quiet, focused workspace? The secret isn’t just more foam; it’s about placement, dampening, and clever ventilation.
This article breaks down the most effective tricks to tame noise, improve sound quality, and keep your gear cool—all without breaking the bank or tearing down walls. Whether you’re setting up a budget home studio or just want a quieter AI rig, these strategies will change how you think about your tiny space.
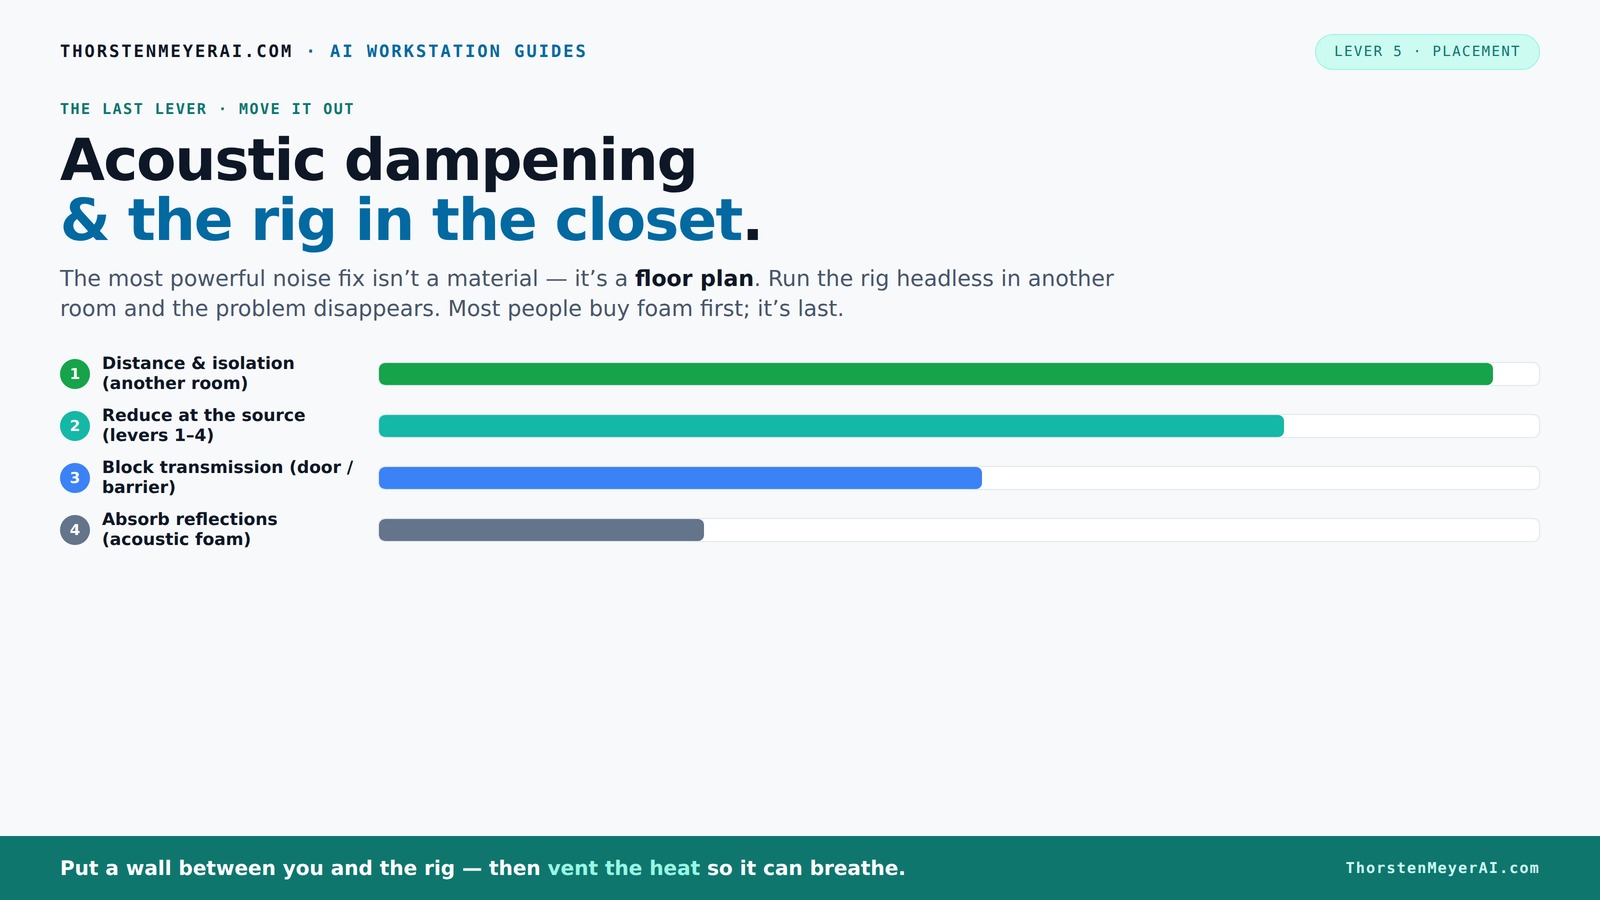
Acoustic dampening
& the rig in the closet.
The most powerful noise fix isn’t a material — it’s a floor plan. A rig you can’t hear because it’s in another room beats any amount of foam. Tap the approaches in Part 1 to see what actually works.
(another room)
(levers 1–4)
(door / barrier)
(acoustic foam)
Contain the noise, not the heat
Key Takeaways
- Sealing gaps and reflection points creates a huge difference in sound quality and noise reduction.
- Choose panel thickness based on your space’s low-frequency issues—2-inch panels work for most small closets.
- Ventilation is as important as dampening—without airflow, your rig will overheat, even if it’s quiet.
- Moving your rig into a different room or closet eliminates most noise issues entirely, saving you from expensive treatments.
- DIY solutions like blankets and foam panels are effective, but for serious noise and heat control, consider engineered enclosures.

Focusound 52 Pack Acoustic Foam Panels 1" x 12" x 12" Sound Proof Foam Panles Soundproofing Noise Cancelling Wedge Panels for Home Office Recoding Studio with 300PCS Double-Side Adhesive
Soundproofing - Acoustic foam panels triangular grooves structure for better noise absorption, helps to reduce and absorb unwanted...
As an affiliate, we earn on qualifying purchases.
As an affiliate, we earn on qualifying purchases.
Why Most Noise Problems in Closets Are About Reflections and Leaks — Not Just Sound
Imagine standing in your closet, shouting in a small, reflective box. That’s the core issue: sound bounces around and leaks out. Acoustic dampening isn’t just about deadening noise; it’s about controlling reflections and sealing gaps. Many folks focus on foam, but the real battle is softening echoes and blocking sound leaks.
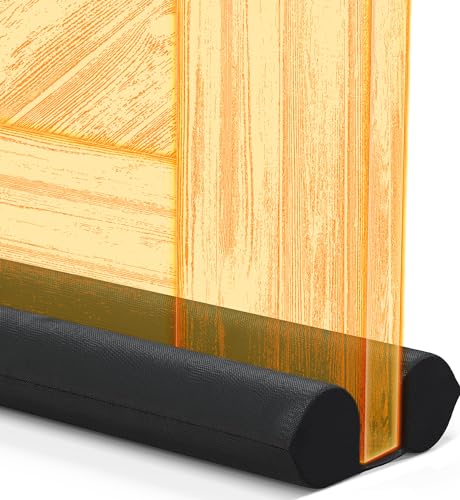
For example, hanging a thick blanket over the door or sealing gaps with weatherstripping can cut down echo and prevent sound from escaping. This is especially true for airborne noise—the hum or high-frequency chatter—while structure-borne noise (like the vibration of your rig) needs different fixes, like rubber feet or decoupling.
Understanding why these issues matter helps you make smarter choices. Excessive reflections create a muddy, unclear sound, reducing your recordings' clarity. Leaks allow noise to escape, disturbing neighbors or recording other parts of your home. Sealing gaps and controlling reflections aren’t just about quietness—they’re about achieving professional-sounding recordings and a more accurate monitoring environment. The tradeoff is that some treatments can deaden the space too much if overdone, so balancing absorption and openness is key.
Everlasting Comfort 2 Sided Door Draft Stopper for Bottom of Door - Keeps Cold Air in & Heat Out, 100% Sound Proofing Strip Gap Filler, Quick Install Noise Blocker Sweep for Home - Fits 30"- 36" W
QUICK AND EASY INSTALL: Ideal for doors 30" to 36" wide. Install in a few easy steps -...
As an affiliate, we earn on qualifying purchases.
As an affiliate, we earn on qualifying purchases.
How to Position Your Microphone and Gear for Cleaner Recordings in a Tiny Closet
Where you place your microphone can make or break your sound. Start by setting the mic where the voice or instrument will be—ideally, a few inches away from the wall behind it. Use the reflection points: a mirror held at an angle to spot where sound bounces directly back at the mic. For more tips, see this guide on microphone placement.
For example, if you’re recording vocals, position the mic about 6-12 inches away, pointed directly at the mouth, with the wall behind covered in absorption panels or blankets. This minimizes echo and creates a cleaner, warmer tone.
Remember: treat the reflection points first, then move to the walls, ceiling, and floor. Small adjustments can dramatically improve clarity. Proper placement reduces comb filtering and phase issues, which can cause a thin or hollow sound. It also helps prevent the microphone from picking up unwanted room noise or echoes, making your recordings sound more professional. The tradeoff is that improper placement can accentuate room noise or cause uneven sound capture, so take time to experiment with angles and distances for optimal results.

TroyStudio Portable Vocal Booth, Large Foldable Microphone Isolation Shield, Music Recording Studio Sound Echo Absorbing Box, Desk & Stand Use Reflection Filter with Thickened Dense Acoustic Foam
【BASIC INFO】: Inside size after setup: 8'' (L) X 10'' (W) X 12'' (H), large space for various...
As an affiliate, we earn on qualifying purchases.
As an affiliate, we earn on qualifying purchases.
The Right Order for Treating Your Closet: Door, Walls, Ceiling, Floor
Treatments should follow a practical hierarchy. First, seal gaps and the door—cracks, hinges, and vents leak sound and ruin your recordings. Then, focus on the walls: add acoustic panels or thick blankets on the reflection points. For more on sealing gaps, visit this resource.
Next, address the ceiling—hang diffusers or foam to prevent echoes from bouncing overhead. Finally, add a rug or carpet on the floor to absorb reflections from the hard surface.
Prioritizing treatment steps ensures maximum benefit with minimal effort. Sealing gaps first prevents sound leaks that can undermine your acoustic efforts. Addressing the reflection points on walls and ceiling then reduces echo and reverb, leading to clearer recordings. Placing a rug or carpet on the floor helps tame low-frequency reflections and standing waves that can muddy your sound. The tradeoff is that neglecting proper order can lead to wasted effort—treating the wrong areas first might not improve your sound as much as focusing on the main reflection and leak points.

VIVOSUN 4" Inline Exhaust Fan & Speed Controller, Low Noise Workshop 130 CFM Duct Fan for HVAC Ventilation, Vent Booster Fan in Grow Tent, Basement, Bathroom, Kitchen, Attic, 3D Printer
Powerful Airflow: Delivers strong airflow up to 130 CFM, efficiently enhancing ventilation and removing exhaust; Ideal for grow...
As an affiliate, we earn on qualifying purchases.
As an affiliate, we earn on qualifying purchases.
How Thick Should Your Acoustic Panels Be — And What Material Works Best?
In a tiny closet, 2-inch thick panels are usually enough to tame mid and high frequencies. Thicker panels, like 4-inch, absorb more bass, which is often problematic in small, enclosed spaces. Foam is affordable and easy to install, but thicker panels or bass traps are better for low frequencies. Learn more about acoustic treatment options at this site.
For example, a DIYer might use 2-inch foam panels on the walls, complemented by a couple of bass traps in the corners. This setup handles most reflection issues without breaking the bank. The choice of material matters: dense foam absorbs mid and high frequencies well, but for bass, rigid mineral wool or specialized bass traps are more effective because they prevent low-frequency buildup that can cause muddiness or boomy sounds. The tradeoff is that thicker panels or bass traps require more space and can be more expensive, but they significantly improve sound clarity, especially in small, reflective spaces.
DIY or Permanent? Budget Solutions vs. Serious Acoustic Constructions
If you’re on a budget, simple solutions like blankets, rugs, and foam panels can dramatically reduce echo. These are easy to move or remove—perfect for renters or temporary setups.
For a more permanent, professional soundproofed booth, consider built-in soundproof panels, sealed doors, and specialized ventilation. These cost more but offer better control and durability. The tradeoff is that permanent solutions require planning, investment, and sometimes structural modifications, which might not be feasible for all. Temporary or DIY fixes are less intrusive but may not eliminate all noise or heat issues, especially in more demanding environments. Balancing cost, effort, and desired results helps you choose the best approach for your situation.
Common Mistakes People Make When Setting Up a Closet Studio
One common mistake is focusing only on foam and ignoring gaps or leaks. Another is over-treating the space, making it sound dead and unpleasant. Also, many fail to consider ventilation, leading to overheating or humidity issues.
For example, sealing every crack without airflow can cause heat buildup, frying your expensive rig. Or, stacking foam panels without considering reflection points leaves the room still echoing. Over-treating can also deaden the space excessively, reducing the natural liveliness needed for certain recordings. The tradeoff is that neglecting ventilation can cause heat and humidity buildup, damaging equipment and affecting comfort. Striking a balance—treat reflection points, seal leaks, and ensure airflow—is crucial for a functional, comfortable, and acoustically optimized space.
Ventilation and Cooling: Making Your Closet Rig Last and Stay Cool
Putting a hot, power-hungry rig in a sealed closet isn’t just about noise; it’s about heat. Without airflow, temperatures can spike from 70°F to 100°F or higher in minutes. That’s a recipe for throttling and hardware failure.
Use active ventilation: a quiet exhaust fan, a vent, or even a small duct with a fan can keep air flowing. For example, a computer case with a custom duct connected to a quiet fan can pull hot air out while drawing in cooler air.
In some setups, a thermostatic fan controller kicks in at a set temperature, maintaining safe operating conditions. Remember, a cool rig performs better and lasts longer. Effective ventilation reduces the risk of overheating, which can cause thermal throttling, system crashes, or hardware damage. The tradeoff is that inadequate cooling can lead to costly repairs or shortened equipment lifespan, so investing in proper airflow solutions is essential for long-term reliability. See more about cooling options in this guide on [liquid vs. air cooling](https://thorstenmeyerai.com/liquid-vs-air-cooling-inference-rig/).
Frequently Asked Questions
How do I soundproof a closet without major construction?
Seal gaps with weatherstripping, hang blankets or foam panels on reflection points, and add a rug to reduce reflections. Ventilate properly to prevent heat buildup. These DIY steps drastically cut noise without tearing down walls.What is the difference between acoustic treatment and soundproofing?
Acoustic treatment controls reflections and echoes inside a space, making it sound better. Soundproofing prevents noise from escaping or entering. In small closets, focus on treatment first—soundproofing is more complex and costly.Where should I place the microphone inside a closet booth?
Position the mic a few inches away from the wall behind it, aimed at the source. Use the mirror trick to find reflection points and treat those spots with foam or blankets for cleaner recordings.How do I prevent heat buildup in a closet rig?
Use active ventilation—exhaust fans or ducts with quiet fans—and consider thermostatic controls. Open vents or install small exhaust fans that pull hot air out while bringing in cooler air, keeping temperatures safe. Proper airflow not only cools your gear but also prevents humidity buildup, which can cause corrosion or mold. The tradeoff is neglecting cooling can lead to hardware failure, so investing in ventilation is crucial for longevity.Can foam panels really make a closet quieter?
Yes, foam panels absorb mid and high frequencies, reducing echo and reverb. However, they don’t block sound leaks. For better isolation, combine foam with sealing gaps and using barriers for airborne noise.Conclusion
Turning a small closet into a workable studio or AI rig space isn’t about perfection. It’s about smart placement, sealing gaps, and managing heat. When you treat your space with intention, your tiny studio can sound clear, stay cool, and stay quiet.
Remember: the best setup is one you can tweak and adapt. A well-ventilated, properly dampened closet isn’t just a cheap fix—it can be a surprisingly effective, long-term solution. So, get that blanket ready, seal those gaps, and give your rig the breathing room it needs.